SmartDocumentor Cloud 101

Joel Monteiro
April 9, 2024SmartDocumentor Cloud 101 is the definitive guide on how to use SmartDocumentor Cloud, an all-in-one intelligent data-processing cloud platform by DevScope.
SmartDocumentor Cloud is the latest product by our team and a logical evolution of the on-premises SmartDocumentor tool that’s been around for almost two decades. The platform is easier to use and more efficient than ever, with capture accuracy close to 100%. In SmartDocumentor Cloud 101, we will cover everything you need to know about the platform to get started and speed up your organization’s data processing.
If you aren’t using SmartDocumentor Cloud yet, you can test it for free by creating a new account, which comes with 30 free credits you can to process your documents, transcribe audio or video files ou anonymize a document or image.
What is SmartDocumentor Cloud?
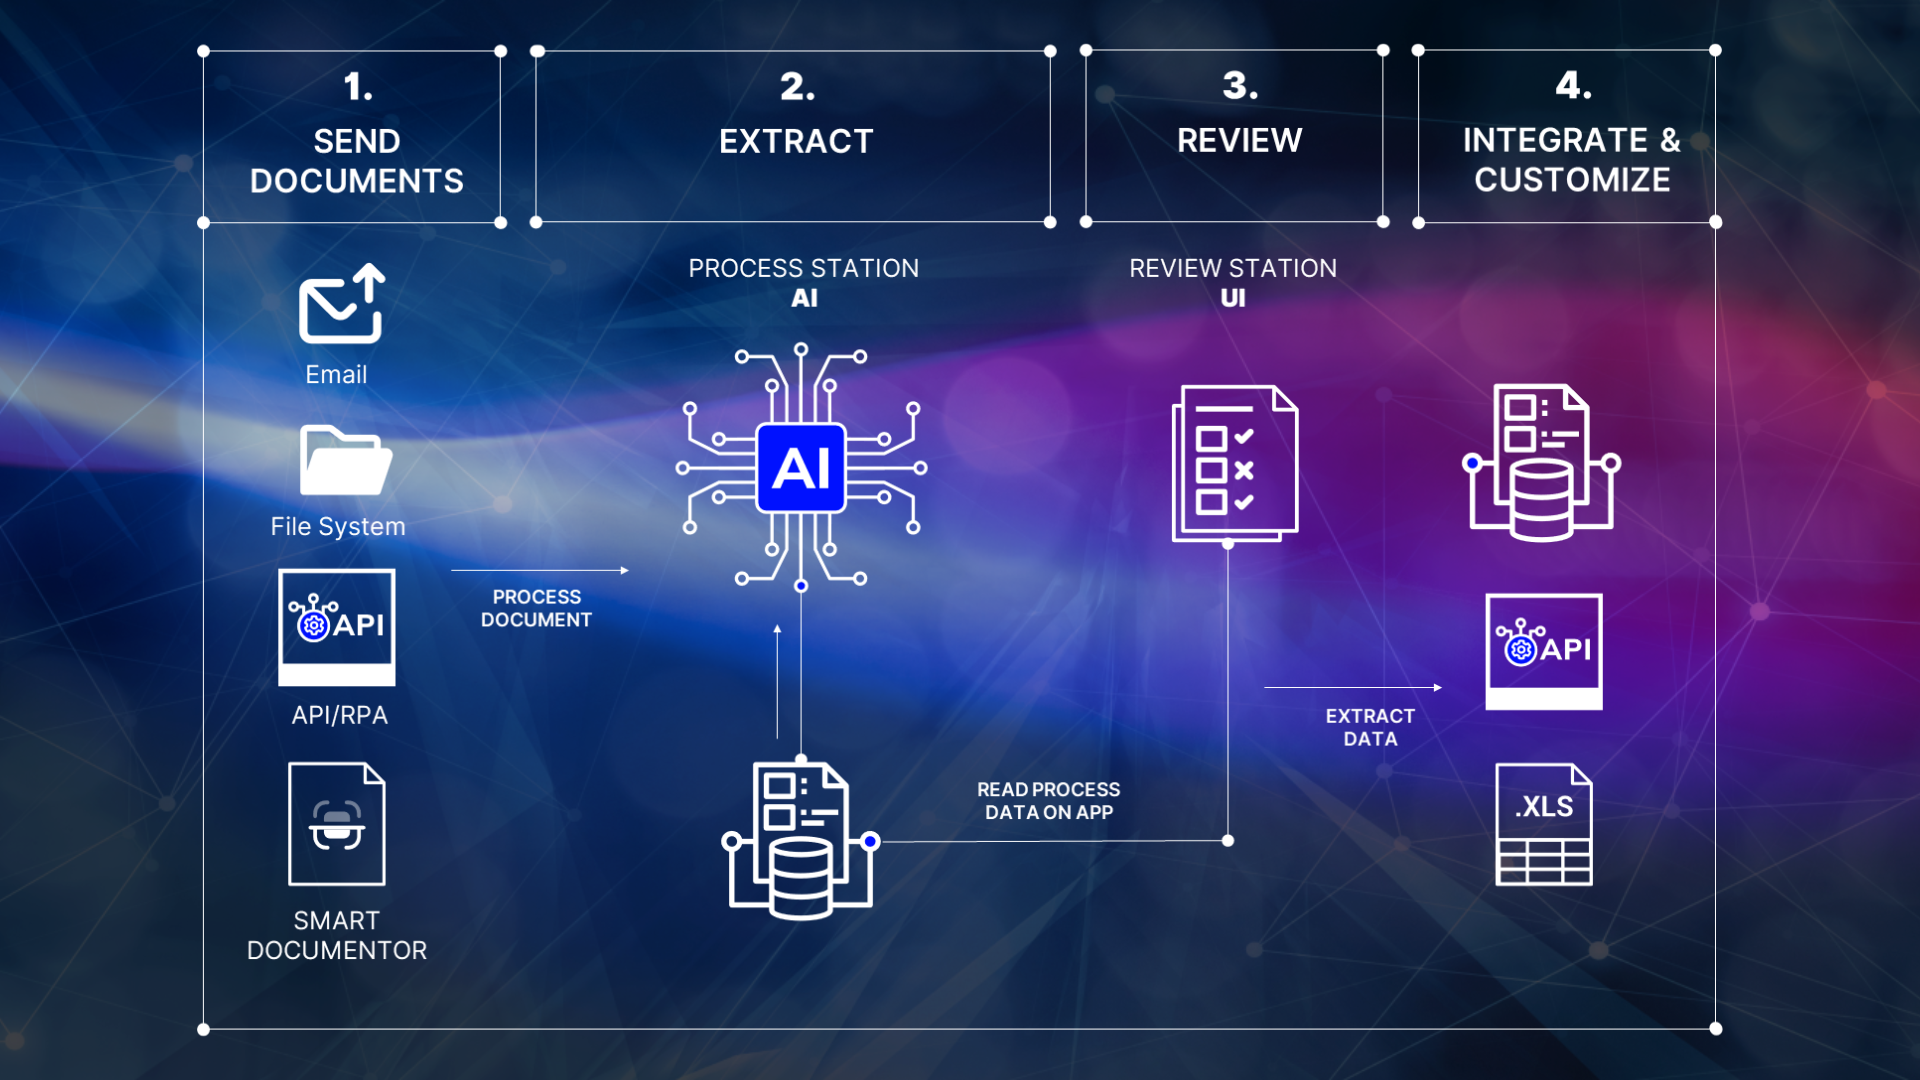
SmartDocumentor Cloud is an all-in-one intelligent data processing platform that automates the processing of paper and digital documents, images, and audio and video files. The platform uses Microsoft Azure AI services to extract and pre-validate information from documents or images, such as invoices, receipts, forms, and other types of paperwork, transcribe text from audio and video files, and anonymize images and text, integrating the output of each into a company’s system. SmartDocumentor Cloud is highly accurate and can recognize various types of data, such as text, numbers, and barcodes, and can export the extracted data into various formats, including Excel, CSV, and XML, as well as .docx files in the case of transcriptions.
As the name implies, SmartDocumentor Cloud is a cloud-based solution, which means it can be accessed from any device connected to the internet. Thanks to its API and webhooks, SmartDocumentor Cloud integrates with other business applications, such as ERP (Enterprise Resource Planning) systems, accounting software, and document management systems, enabling businesses to automate their document processing workflows, reduce manual data entry, improve accuracy, and reduce overall costs associated with data processing.
What are the benefits of using SmartDocumentor Cloud?
Thanks to its AI-powered technology, SmartDocumentor Cloud can capture and extract large volumes of data more efficiently and at a much lower cost than manual data extraction or traditional OCR software, both of which are tedious, time-consuming, and highly prone to errors.
AI OCR, as opposed to traditional OCR software, does not rely on predefined rules or templates to extract data; it can quickly and easily extract data from a wide range of document layouts, without the need for manual intervention, making it ideal for automating document workflows and improving efficiency.
With SmartDocumentor Cloud, a few minutes is all it takes to process large numbers of documents, and thanks to its intuitive user interface, human operators can quickly verify the extracted data, which in turn improves the accuracy of the AI system and enables it to adapt to new document layouts more effectively.
The extracted data can be automatically exported into your business systems, providing a complete solution for processing documents. By adopting SmartDocumentor Cloud, you can save valuable resources and streamline your document workflows, increase productivity, and free employees to perform more meaningful tasks.
All things considered, SmartDocumentor Cloud:
- Saves you time and money – it can quickly process large amounts of documents with minimal human input during validation.
- Improves efficiency – it’s faster than any human performing an audio transcription or manually validating each field and more accurate than a traditional OCR system.
- Automates your document workflows – it’s an end-to-end centralized integrated system, from data upload to data integration.
- Frees human resources – it greatly reduces time spent on data processing, validation, and integration.
Who is SmartDocumentor Cloud for?
SmartDocumentor Cloud automates the document processing workflow of any business and can be used by a wide range of industries, including:
Accounting and finance: SmartDocumentor Cloud can help to automate invoice processing, expense reports, and other financial documents.
Healthcare: Healthcare organizations can use SmartDocumentor Cloud to process and anonymize medical records, insurance claims, and other patient-related documents.
Human resources: SmartDocumentor Cloud can help HR departments to automate the processing of employee documents, such as resumes, job applications, and performance evaluations. It can also anonymize any personal information so that the recruitment process is as unbiased as possible.
Legal: Law firms and legal departments can use SmartDocumentor Cloud to automate the processing of legal documents, such as contracts, agreements, and court filings, as well as transcribe courtroom hearings and other legal hearings.
Logistics and transportation: SmartDocumentor Cloud can help to automate the processing of shipping documents, bills of lading, and other logistics-related paperwork.
Retail and e-commerce: Retailers and e-commerce companies can use SmartDocumentor Cloud to process invoices, receipts, and other sales-related documents.
The more documents a company regularly processes, the more useful SmartDocumentor Cloud becomes. Its business model is also adjusted to these needs: the more data your company needs to process, the lower the price you pay.
SmartDocumentor Cloud centralizes the data extraction process and information in a single place and accepts multiple types of input. Documents can be uploaded locally, but also sent via email by any worker or automatically absorbed via API, which eliminates the need to have a worker locally scanning them. Information is quickly validated manually, and automatic validation can be turned on for document templates with a high enough trust rate where the margin for error is null. All in all, SmartDocumentor Cloud greatly reduces the time companies spend processing documents and optimizes the human resources allocated to it.
Navigating SmartDocumentor Cloud
Navigation in SmartDocumentor Cloud is done through the side menu, which you can fully display or minimize by clicking the circle next to the product’s logo.
SmartDocumentor Cloud’s menu contains the following options:
- Documents – where you’ll be able to process anything, from invoices to audio files.
- Templates – where you can train SmartDocumentor Cloud to retrieve and process data from new templates outside the regular invoice/receipt models.
- Statistics – where you can check metrics related to your organization’s data processing using SmartDocumentor Cloud.
- Workspaces – where you can change the settings of the current workspace.
- Organization – where you can manage the users in your organization.
- Licensing – where you can manage your SmartDocumentor Cloud subscription.
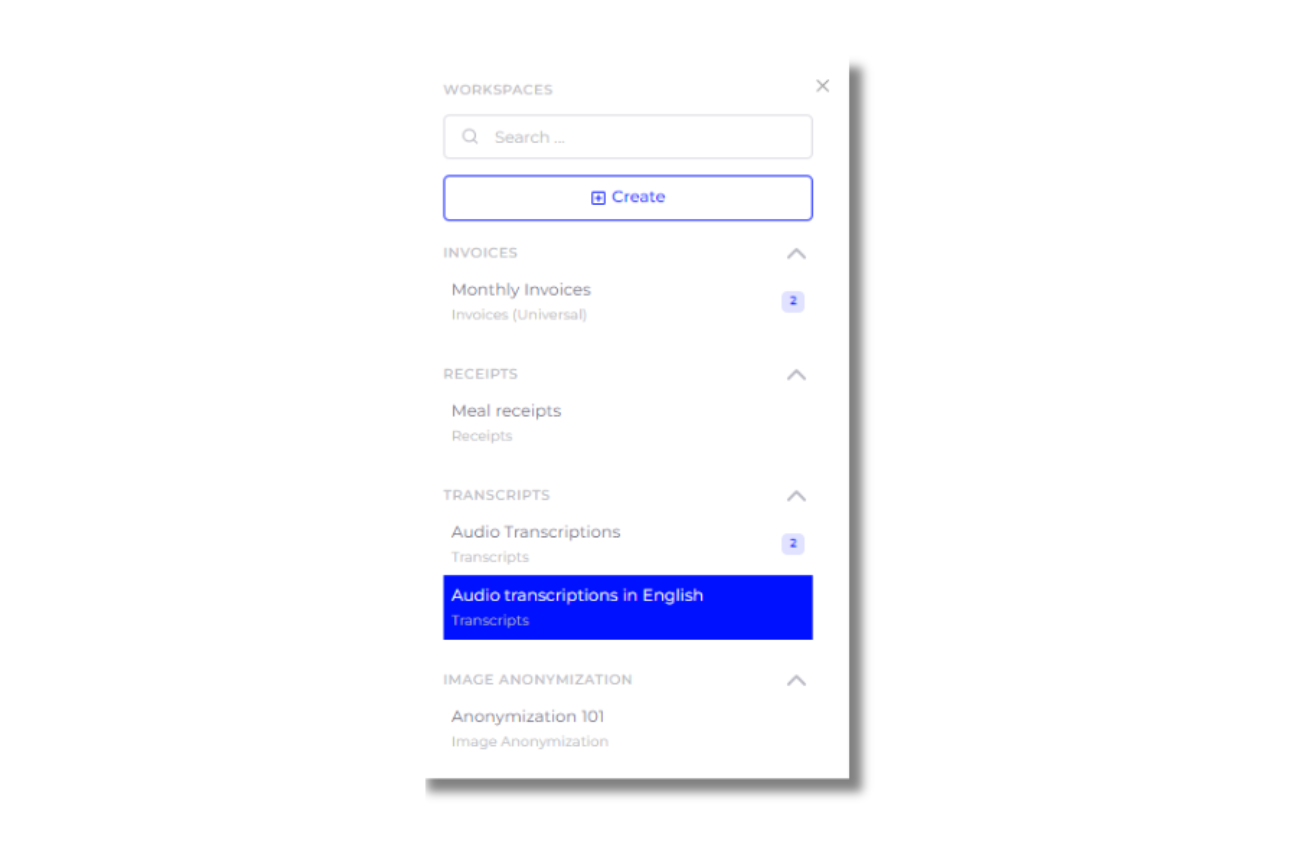
Additionally, you’ll find a Workspaces menu on your right, opposite the main menu, where you can create and switch between workspaces.
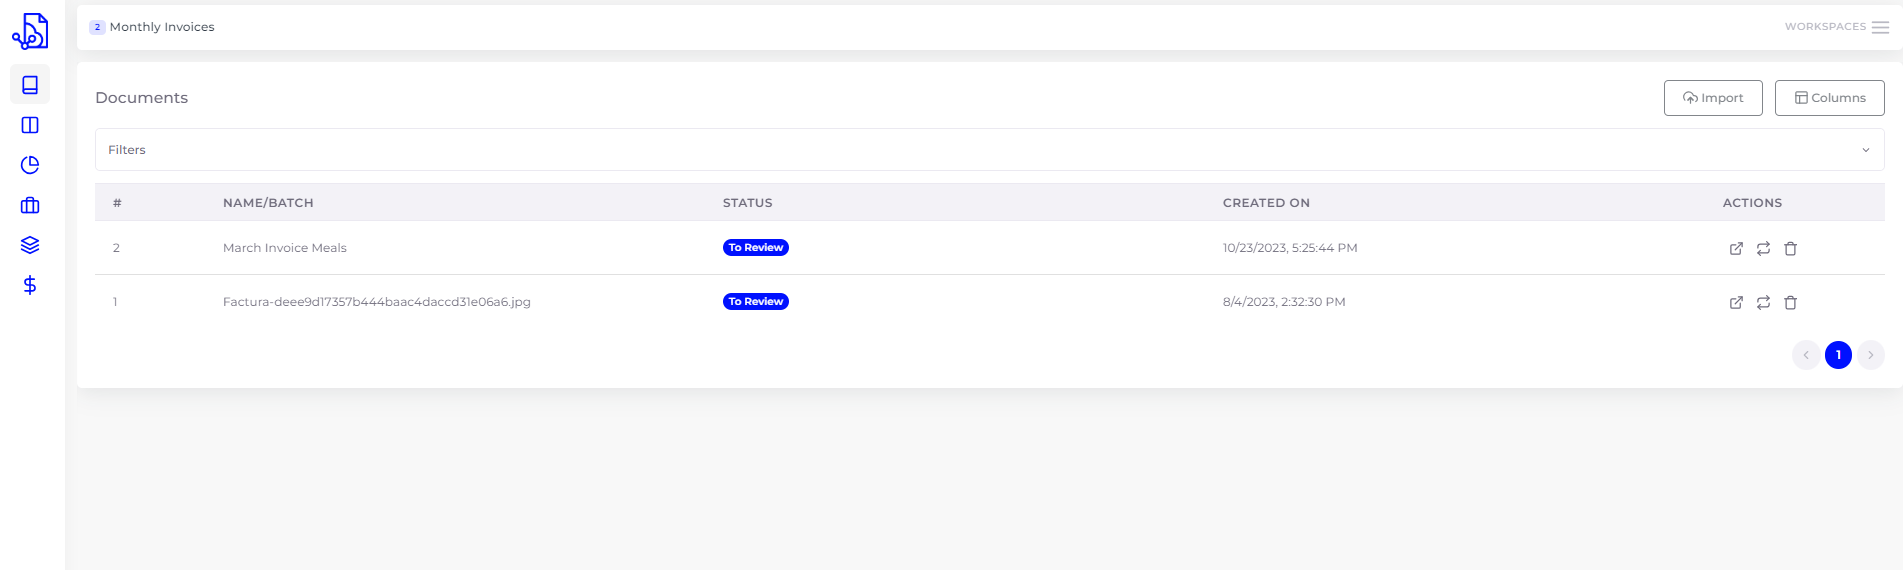
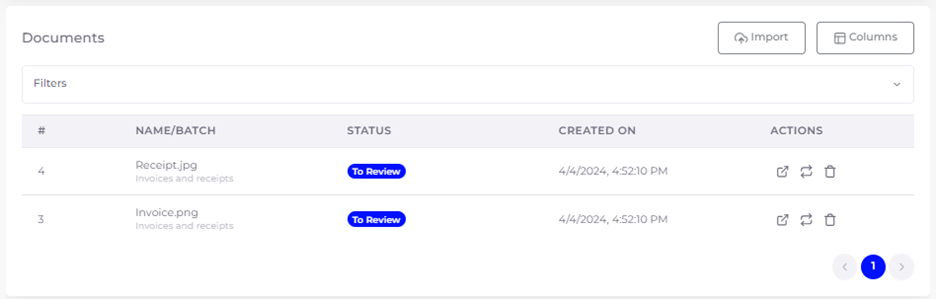
Most of a user’s time in SmartDocumentor Cloud will be spent in the Documents section, which is composed of an All, a Batches, and an Archive subsection. Tasks that need reviewing will be stored in the All subsection while reviewed tasks will go to the Archive subsection where they’ll stay for 31 days, by default, before being erased.
Below Documents, we have the Templates section, which lets users create their own document template and train AI to recognize the fields on that model.
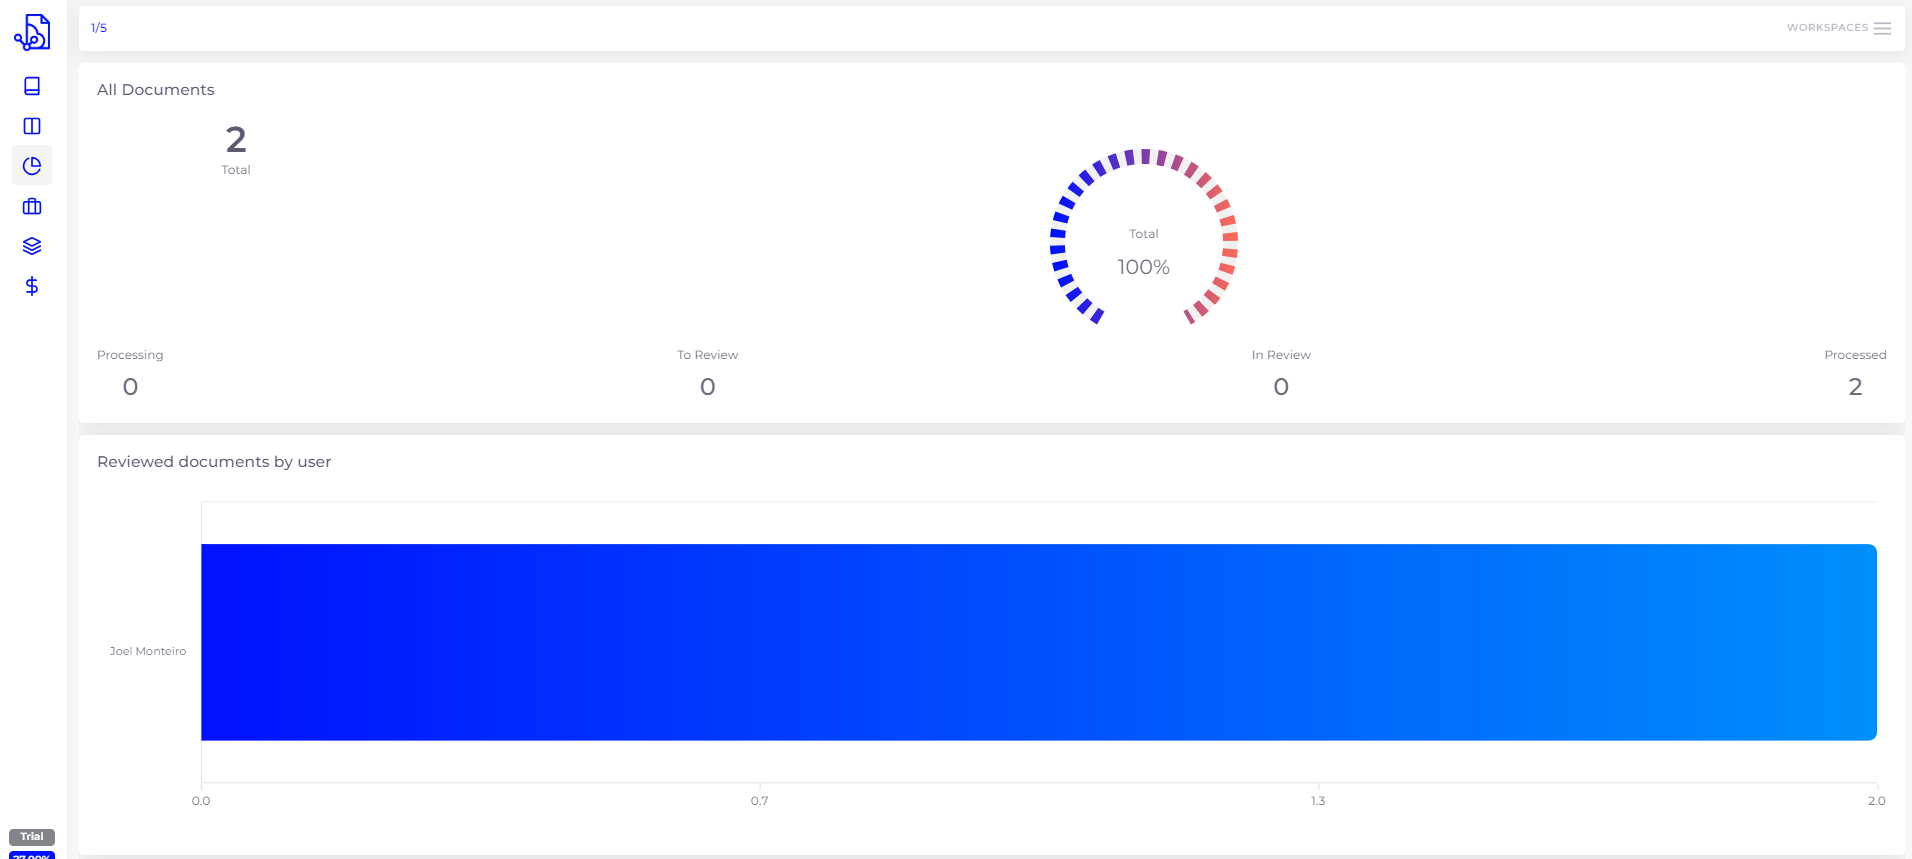
Next, we have the Statistics section which presents basic statistics on the work being done in your workspace. Workspaces can be individually selected and selecting more than one will aggregate their information into a single report.
As the name implies, Workspaces is where you can create and manage the workspaces we’ve been talking about. We’ll cover them in full in point 4.
Our next section is Organization. Here, you can change your organization’s name and manage user permissions and access to SmartDocumentor Cloud.
Finally, we have Licensing. A SmartDocumentor Cloud license gives the user an assorted number of credits they can use. In the first tab of the Licensing section, you can buy and activate a SmartDocumentor Cloud license. In the second, you can see how your credits are being used. As we mentioned, if you want to try SmartDocumentor Cloud before purchasing a license, you can create a trial account, which has 30 credits to spend however you choose.
Creating and using a workspace
To create a workspace in SmartDocumentor Cloud, click Workspaces from the sidebar. The workspaces navigation column will appear next to the sidebar and at the top of this column you can find the Create button. Click it and a modal window will open. You can name your workspace and write a brief description of it. You can set it as your default workspace (i.e., the one that will always appear first when you later access your workspaces). Finally, you need to select a template for your workspace:
- Receipts – to process receipts from multiple countries.
- Invoices (universal) – to process invoices from multiple countries.
- Invoices (Portugal) – to process invoices from Portugal, which must be compliant with a QR code standard.
- Document anonymization – to redact data from documents.
- Image anonymization – to censor elements in images, like faces or text.
- Transcripts – to transcribe text from audio and video files.
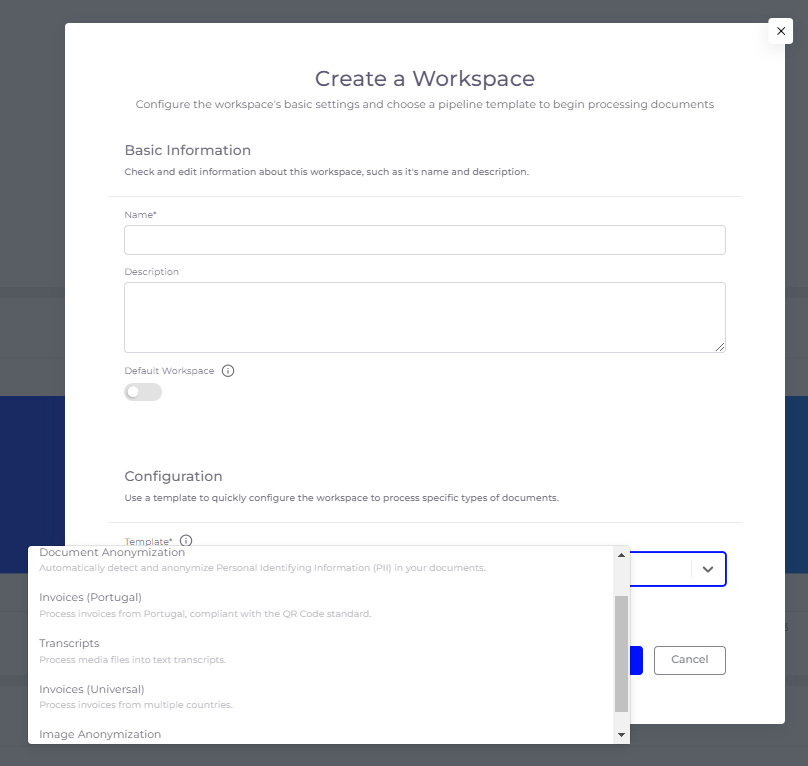
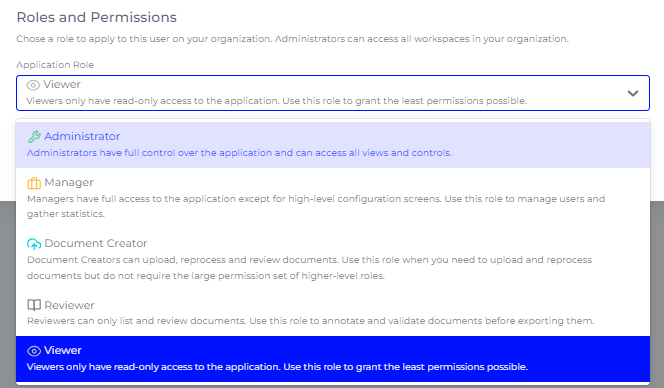
Hit Create to create your workspace, and let’s explore its settings in the Workspaces submenu. In the Basic tab, you can change the settings you applied in the modal window (name, description, set as default). Under users, you have a roles overview that tells you how many users you have in each role, plus a button that lets you invite new users to this workspace. When you click it, a modal window pops up with a field to input a user’s email address. Once you do, you can edit that user’s name and set their role, picking from the drop-down menu. Each role’s permissions are described alongside it.
Next up, we have fields, if your workspace is doing anything other than Transcriptions. This is where you can set which fields SmartDocumentor Cloud should automatically detect when you upload a document or image to this workspace. By default, all pre-set generic and table fields are enabled, but you can toggle them off if you don’t want some types of data to be captured. You can also click the Add New Field button to add a new field to the Generic and Table lists, in which case you must enter the field’s category key (readable by the machine) and a display name (readable by users). You can also write a short description of this new field, attribute it a fill and border color, identify its type and make it mandatory.
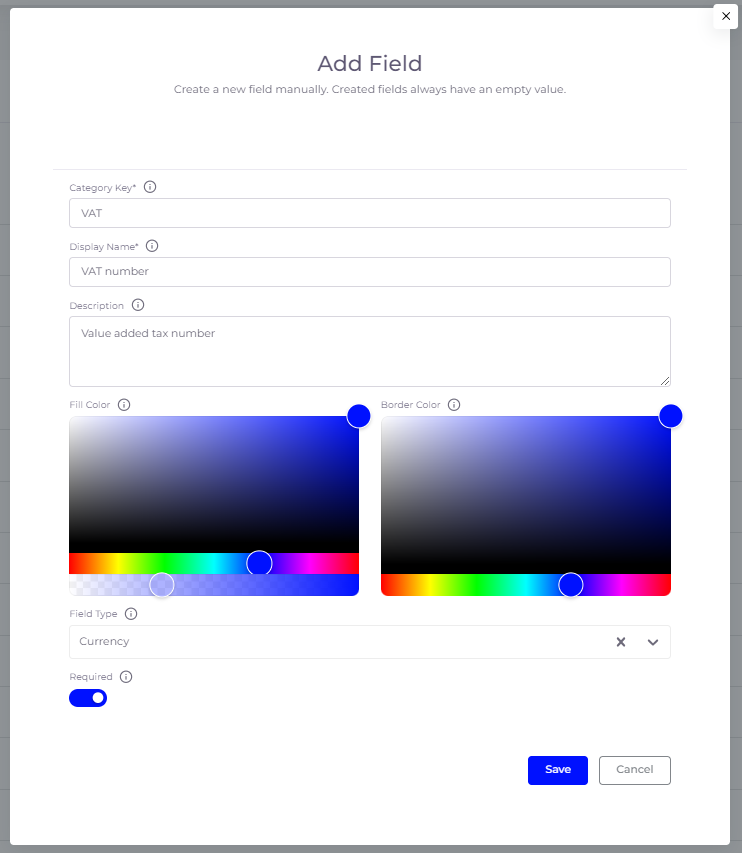
A good practice when naming your category key is following the convention used by the pre-set categories – “Categories.(Type).(fieldName)”. As an example, if you want to add a Product Name field under invoices, the category key should be “Categories.Invoices.ProductName” (no quotation marks). Don’t forget to click the Save button at the top right corner of this tab, otherwise your changes will be lost.
In the case of transcriptions, you’ll have the Predefined Texts and Predefined Speakers tabs, which allows you to set snippets of text you often use to replace what SmartDocumentor Cloud detects (for example, you can set abbreviations) or speakers that you’ll often find in your recordings, so you don’t have to manually create them every time.
Next, we have the Export tab. By default, your revised documents are not automatically exported, meaning you must manually export them by either clicking that option in the review modal window of a document or under action, from the revised document’s list.
However, one of SmartDocumentor’s Cloud’s biggest strengths is the ability to connect it to an HTTP REST POST endpoint and have all your revised documents automatically exported to it. You can select and configure your Endpoint under Webhook. You can learn more about exporting data in point 5 of this SmartDocumentor 101 article.
Finally, we have the Advanced Settings tab, which varies according to the type of workspace you’re on. The option to delete a workspace is also found in this tab.
Always keep in mind that each workspace has its own settings. If you create more than one workspace, you will have to tweak its settings to your liking.
Uploading and reviewing files
After setting up a workspace, you can add files for revision to it. SmartDocumentor Cloud detects PDF, PNG, JPG and JPEG files, when processing documents, and .MP3, .WMA, .WAV, .MP4, .MOV, .WEBM, .FLAC, .OGG, .M4A, .AAC up to a maximum of 250MB when transcribing from audio and video files. To import a file in one of these formats, click Documents from the menu, and select either All to add individual files or Batches to add files in bulk that will be grouped together as a batch. Next, click Import on the top right corner of the screen. A modal window will pop up, giving you the options we are about to explore:
1- Import via Web
When using this option, you can simply upload a local file on your computer to SmartDocumentor Cloud by either dragging the file to this box or clicking to search for it. Once you find a file with a supported extension, click the Import button to start processing it.
2- Import via URL
If the file you’re looking to process is an image hosted online, you can paste its URL instead. This URL must be public or have an access token in it, otherwise SmartDocumentor Cloud won’t be able to reach the file.
3- Import via Email
Any employee can send expenses and other documents to SmartDocumentor Cloud without having to install an app on their phone or upload them on a dedicated platform on their computers. All they need to do is annex any document to an email and send it with the subject “SmartDocumentor Cloud Upload” (without quotation marks) to the unique email account SmartDocumentor Cloud generates for each organization. That unique email is found at the top of the modal window we just opened.
4- Import via API
If you’re looking to fully automate SmartDocumentor Cloud’s upload process, you can do it via API. Currently, you need to contact our support team to configure this option.
Regardless of the way you connect your files, SmartDocumentor will display a list of the Tasks you have for review.
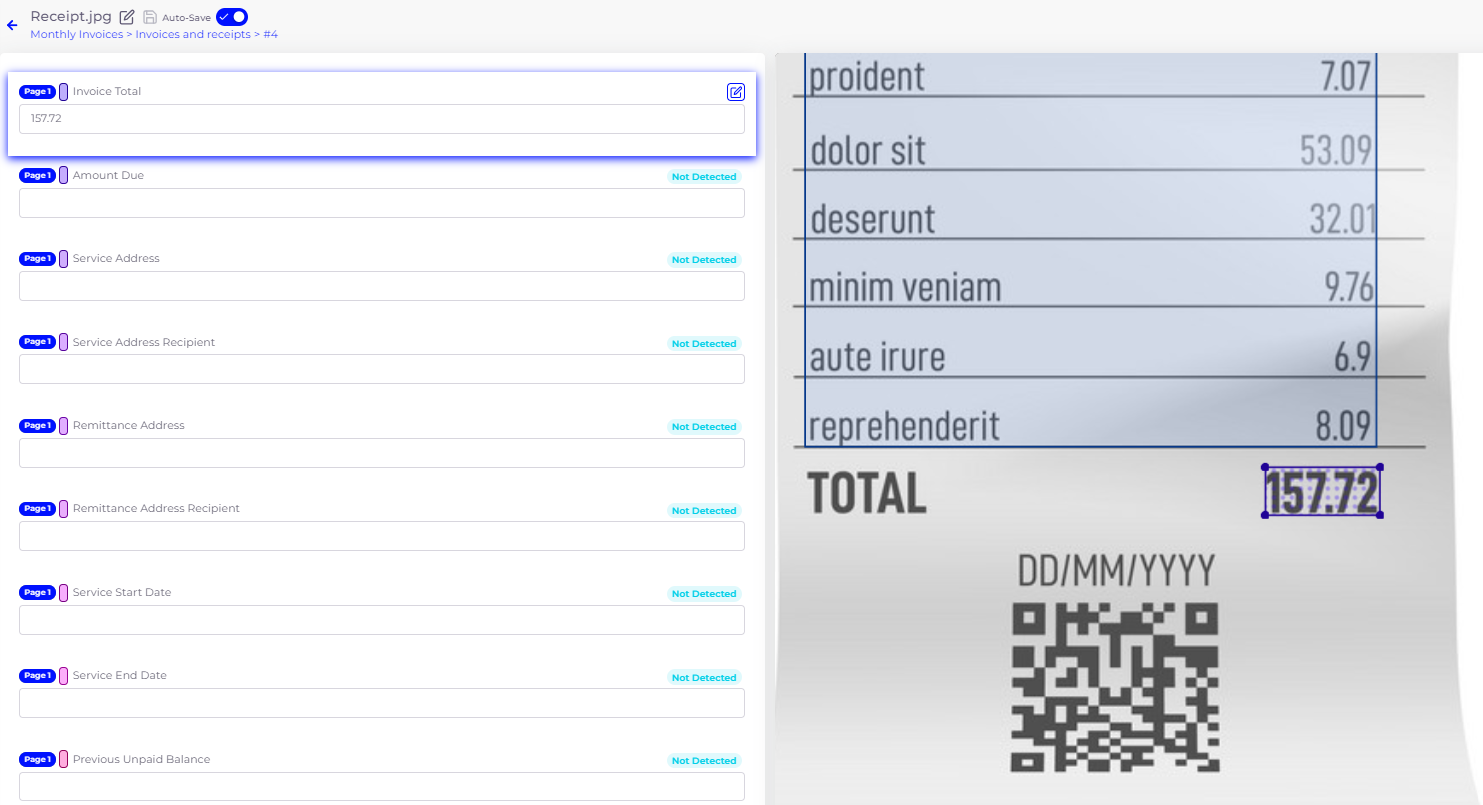
Once your file status switches to “To Review”, click it to go to review mode. Your document will be displayed on the right with all the fields set in this workspace’s options underlined. On the left, you can go over each field. By clicking it, SmartDocumentor Cloud zooms in on the document so you can compare what was detected with the original and fix any information that was not properly detected.
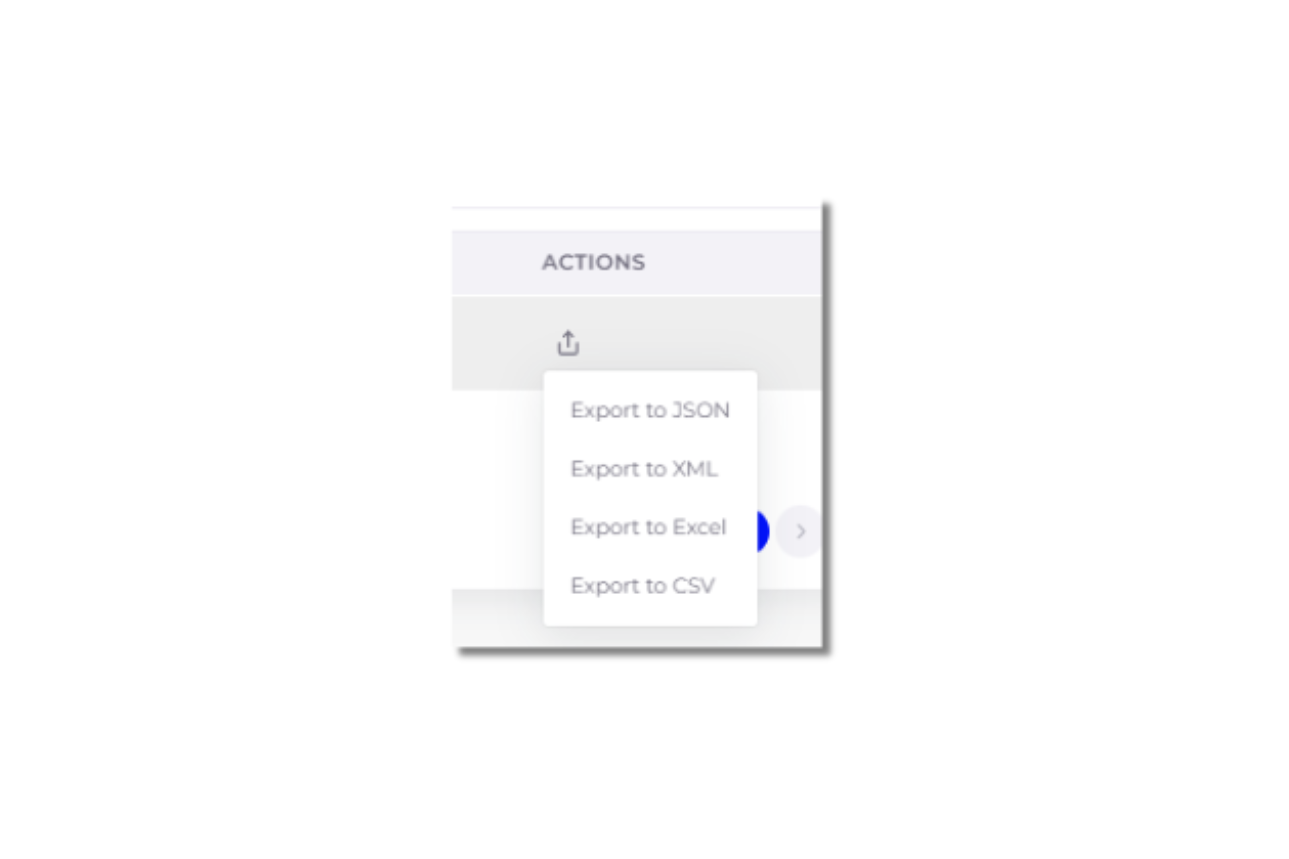
While reviewing your documents, you have the option to manually export data from SmartDocumentor Cloud on the top right corner of your screen. You can choose to export as JSON, XML, Excel, and CSV.
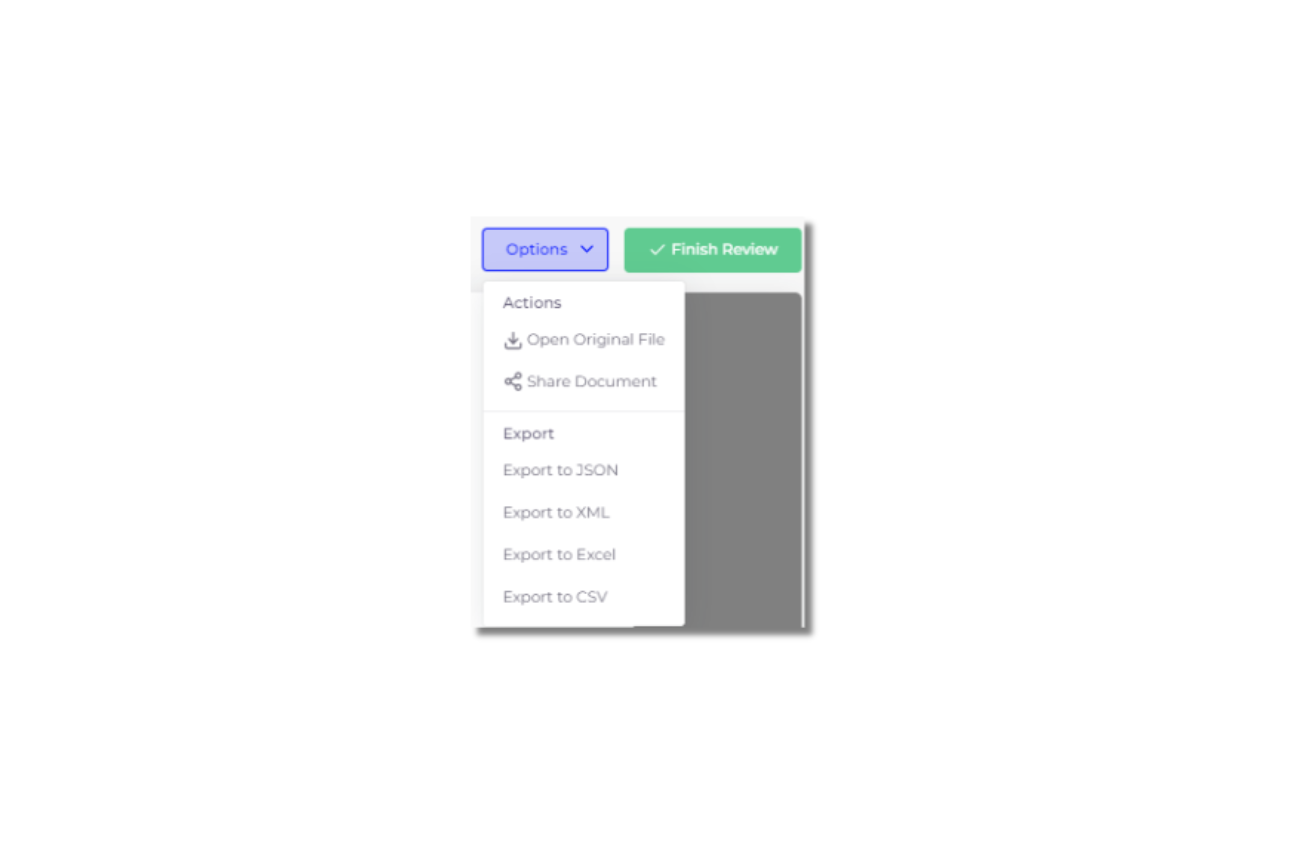
Once you’re done reviewing the document, you can click the Finish Review button at the top right corner of your screen.
Next steps
SmartDocumentor Cloud 101 is just the tip of the iceberg when it comes to using the platform. If you want to learn how to take full advantage of each of SmartDocumentor Cloud’s modules, we will be publishing a detailed tutorial for each of them.
If you still have any questions regarding SmartDocumentor Cloud, please contact us by email.

How to customize PowerBI Portal’s login page
Learn how to customize PowerBI Portal's login page and seamlessly integrate it into your organization's ecosystem.